| Vue(3.0) Composition API | 您所在的位置:网站首页 › directive vue › Vue(3.0) Composition API |
Vue(3.0) Composition API
%20%20Angular(v14)%20%20MongoDB%20%20CRUD%20Example.png) In this article, we are going to implement a sample Vue(3.0) CRUD example, using JSON Server(Fake API).Vue(3.0):Vue(3.0) is a javascript framework for creating a single-page application. Vue application built by component. The components are the smallest unit of the application which comprises 'Script', 'Template(HTML)', and 'Style'. Eventually, multiple components together create the Vue application. In this article, we are going to implement a sample Vue(3.0) CRUD example, using JSON Server(Fake API).Vue(3.0):Vue(3.0) is a javascript framework for creating a single-page application. Vue application built by component. The components are the smallest unit of the application which comprises 'Script', 'Template(HTML)', and 'Style'. Eventually, multiple components together create the Vue application.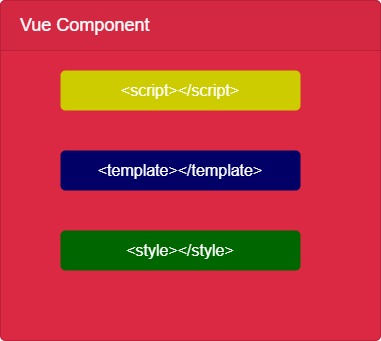 Create Vue(3.0) Application:Let's create a sample Vue(3.0) application to accomplish our demo.To create a VueJS application our local machine should contain NodeJS. So go to "https://nodejs.org/en/download" and download the Node.
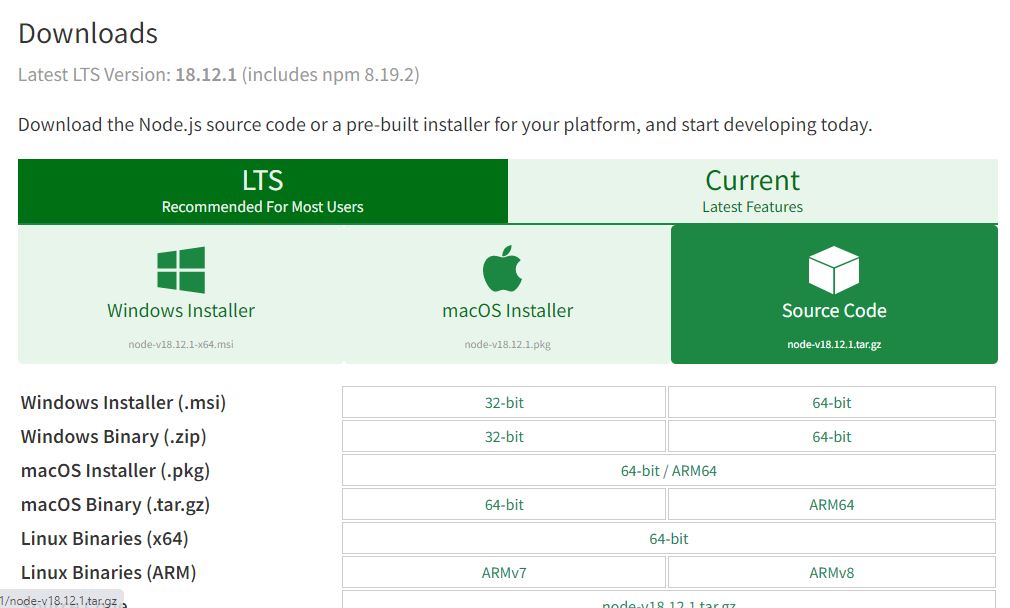 Now run the below command to create the Vue3 application.
npm init vue@latest
On running the above command we have to choose a few options before creating a vue application, in those options we can choose the default option as 'No', but for the routing option select 'Yes' like below. Now run the below command to create the Vue3 application.
npm init vue@latest
On running the above command we have to choose a few options before creating a vue application, in those options we can choose the default option as 'No', but for the routing option select 'Yes' like below.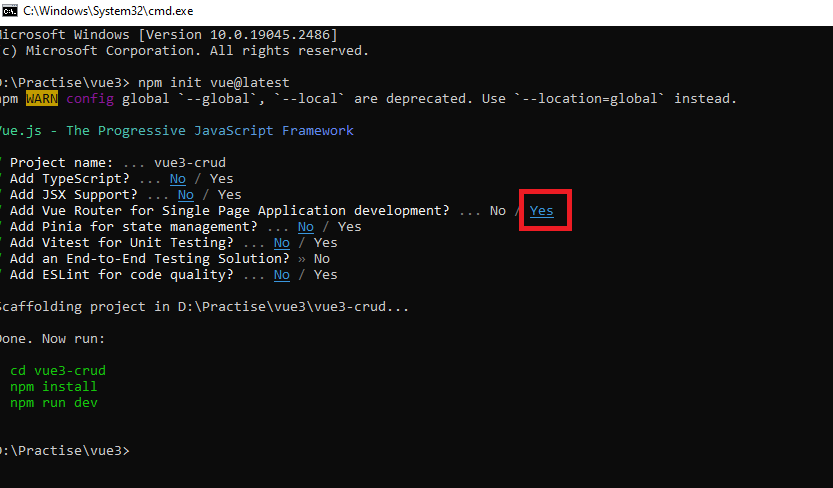 Now open our vue application in 'Visual Studio Code' editor and then run the 'npm install' command to download the required packages.Let's explore the project default files & folders structure:package.json - the 'package.json' file contains package references, commands, etc.index.html - the 'index.html' file is the only HTML file of our vue application. It contains a 'div' element with 'id' value 'app', so inside of those elements our components get rendered.main.js - entry js file.App.vue - entry vue component.views(folder) - contains vue component that acts as an individual page.router(folder) - contains js file which contains route configuration.components(folder) - contains vue components that can be used as children's componentsassets(folder) - contains static files like images.Run the below command to start the VueJS application under the local server.
npm run dev
Setup JSON Server(Fake API):Let's set up a fake API by setting up the JSON server in our local machine.Run the below command to install the JSON server globally onto your local system.
npm install -g json-server
Now go to our Vue application and add a command to run the JSON server into the 'pakage.json' file Now open our vue application in 'Visual Studio Code' editor and then run the 'npm install' command to download the required packages.Let's explore the project default files & folders structure:package.json - the 'package.json' file contains package references, commands, etc.index.html - the 'index.html' file is the only HTML file of our vue application. It contains a 'div' element with 'id' value 'app', so inside of those elements our components get rendered.main.js - entry js file.App.vue - entry vue component.views(folder) - contains vue component that acts as an individual page.router(folder) - contains js file which contains route configuration.components(folder) - contains vue components that can be used as children's componentsassets(folder) - contains static files like images.Run the below command to start the VueJS application under the local server.
npm run dev
Setup JSON Server(Fake API):Let's set up a fake API by setting up the JSON server in our local machine.Run the below command to install the JSON server globally onto your local system.
npm install -g json-server
Now go to our Vue application and add a command to run the JSON server into the 'pakage.json' file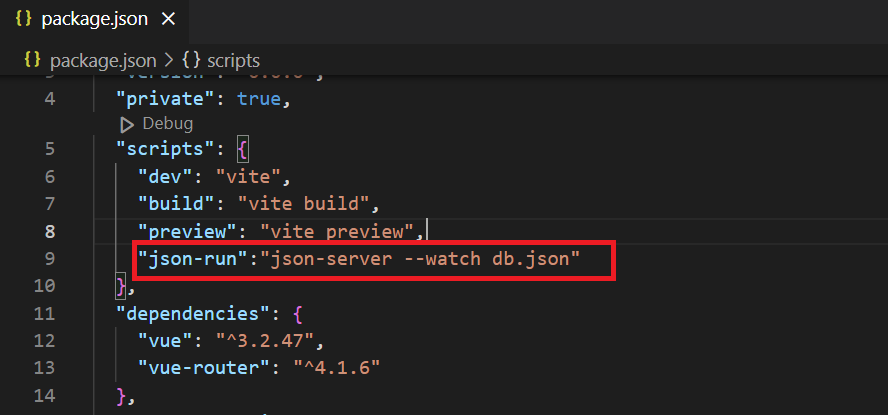 Now to invoke the above added command, run the below command in vue application root folder
npm run json-run
After running the above command for the first time, a 'db.json' file gets created, so this file act as a database. So let's add some sample data to the file as below. Now to invoke the above added command, run the below command in vue application root folder
npm run json-run
After running the above command for the first time, a 'db.json' file gets created, so this file act as a database. So let's add some sample data to the file as below.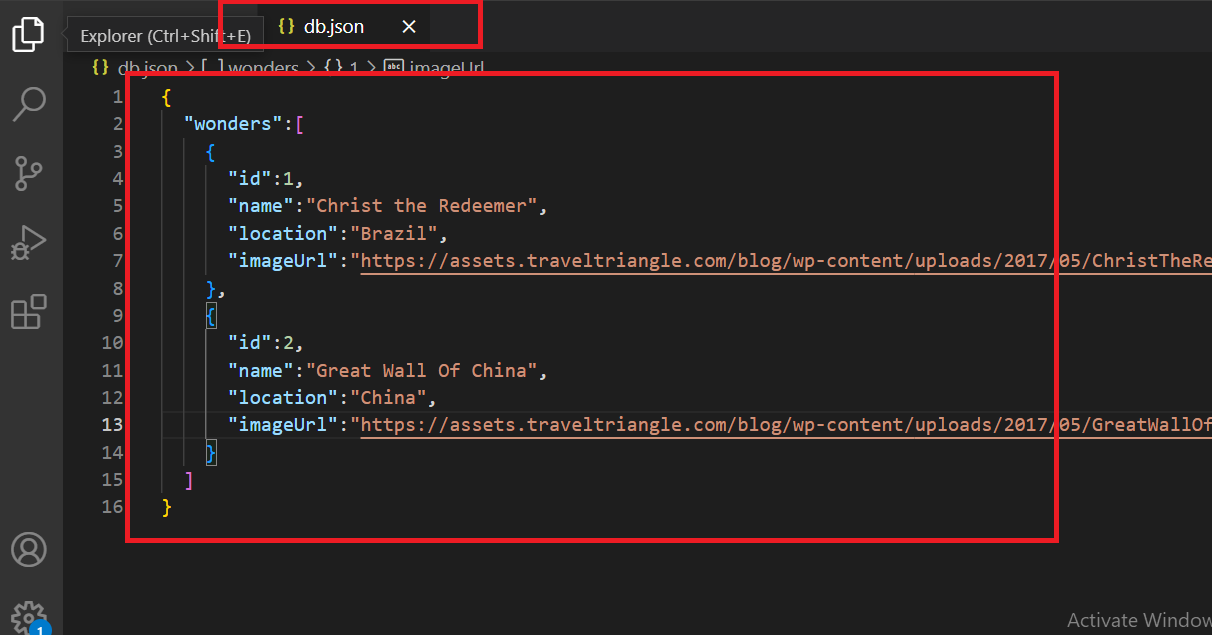 Now access the fake JSON endpoint like 'http://localhost:3000/wonders' Now access the fake JSON endpoint like 'http://localhost:3000/wonders'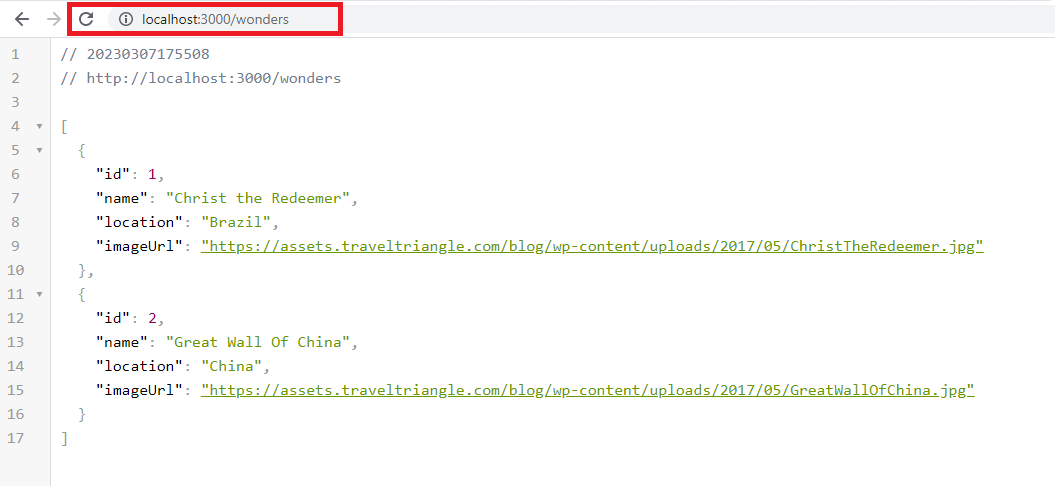 Configure Bootstrap Menu:In the 'index.html' add the bootstrap CSS and JS file references.index.html:
Vite App
(Line: 8-13) Bootstrap CSS reference(Line: 18-22) Bootstrap JS reference
Next, remove the default CSS file 'src/assets/main.css' and also remove its reference from the 'main.js'Now let's update the 'App.vue' component with the bootstrap menu as follows.src/App.vue:
import { RouterLink, RouterView } from "vue-router";
7 Wonders Of The World
Here added our bootstrap. The 'RouterView' is the default component loads from the 'vue-router'. The 'RouterView' component renders the page content
Configure Bootstrap Menu:In the 'index.html' add the bootstrap CSS and JS file references.index.html:
Vite App
(Line: 8-13) Bootstrap CSS reference(Line: 18-22) Bootstrap JS reference
Next, remove the default CSS file 'src/assets/main.css' and also remove its reference from the 'main.js'Now let's update the 'App.vue' component with the bootstrap menu as follows.src/App.vue:
import { RouterLink, RouterView } from "vue-router";
7 Wonders Of The World
Here added our bootstrap. The 'RouterView' is the default component loads from the 'vue-router'. The 'RouterView' component renders the page content Install Axio Library:To consume API calls we need to install Axios library
npm install axios
Create A 'AllWonders' Vue Component:Let's create a new vue component 'AllWonders.vue' in 'src/views/wonders'(new folder). Install Axio Library:To consume API calls we need to install Axios library
npm install axios
Create A 'AllWonders' Vue Component:Let's create a new vue component 'AllWonders.vue' in 'src/views/wonders'(new folder).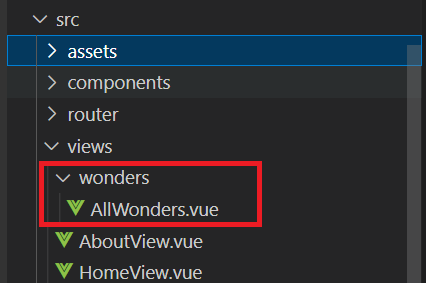 Now configure the route for 'AllWonders.vue' component in the 'router/index.js'.src/router/index.js:
import { createRouter, createWebHistory } from "vue-router";
import AllWonders from "../views/wonders/AllWonders.vue";
const router = createRouter({
history: createWebHistory(importa.env.BASE_URL),
routes: [
{
path: "/",
name: "home",
component: AllWonders,
},
],
});
export default router;
Here configured a route like '/' to our 'AllWonders' component.
Implement Read Operation:Read operation means invoking the HTTP GET endpoint, and rendering the API response to the UI.src/views/wonders/AllWonders.vue:
import { ref, onMounted } from "vue";
import axios from "axios";
const allWonders = ref([]);
onMounted(() => {
axios.get("http://localhost:3000/wonders").then((response) => {
allWonders.value = response.data;
});
}); Now configure the route for 'AllWonders.vue' component in the 'router/index.js'.src/router/index.js:
import { createRouter, createWebHistory } from "vue-router";
import AllWonders from "../views/wonders/AllWonders.vue";
const router = createRouter({
history: createWebHistory(importa.env.BASE_URL),
routes: [
{
path: "/",
name: "home",
component: AllWonders,
},
],
});
export default router;
Here configured a route like '/' to our 'AllWonders' component.
Implement Read Operation:Read operation means invoking the HTTP GET endpoint, and rendering the API response to the UI.src/views/wonders/AllWonders.vue:
import { ref, onMounted } from "vue";
import axios from "axios";
const allWonders = ref([]);
onMounted(() => {
axios.get("http://localhost:3000/wonders").then((response) => {
allWonders.value = response.data;
});
});
Location: {{ item.location }} (Line: 1) The 'setup' attribute added to the script tag that represents we are using the composition API approach.(Line: 4) Declared 'allWonders' variable of type 'ref'. The 'ref' type is used to declare the reactive properties. Here 'ref([])' means an empty array will be the initial value for the 'allWonders' variable. The 'ref' imports from the 'vue' library.(Line: 5) The 'onMounted' is the life cycle method. Here we can add our logic that needs to be executed on the component mounted. Here generally we invoke our APIS whose response we want to display on page load.(Line: 6-8) Using 'axios.get()' invoking our HTTP GET API endpoint. Here API response assigned to 'allWonders' variable. In vue to assign value to 'ref' variable we should assign to '{variable}.value', we can't directly assign it to the variable itself.(Line: 12-24) Inside the 'template' element we have to render all our component HTML content.(Line: 14) The 'v-for' attribute is used to loop the HTML element based on the collection variable(allWonders). The ':key' attribute is assigned with a unique values like 'id' this helps with HTML track.In vue to render any data dynamically or data binding we have to use ''{{}}" Now run both vue application and Json Server(fake API).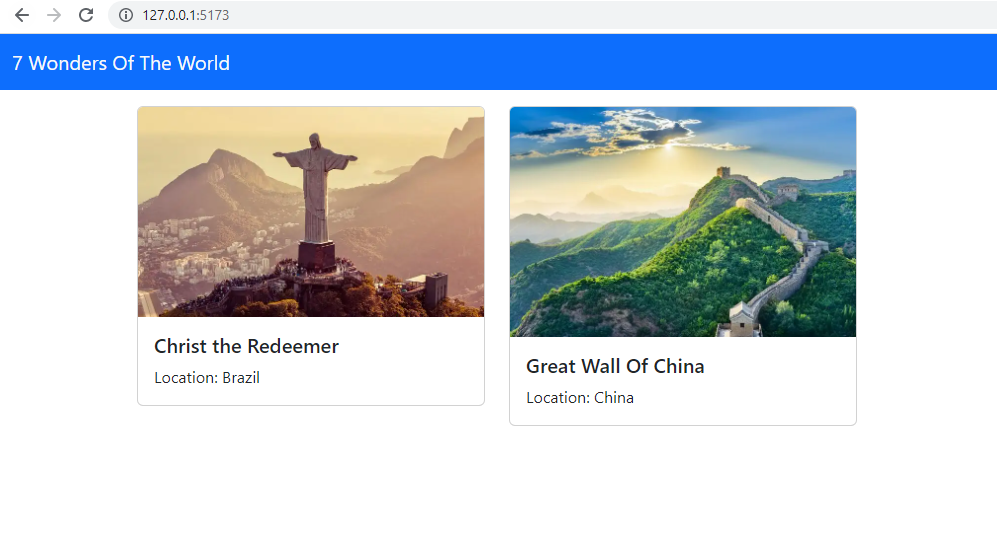 Create A 'AddWonders.vue' Component:Let's create a new Vue component 'AddWornders.vue' in 'src/views/wonders'.
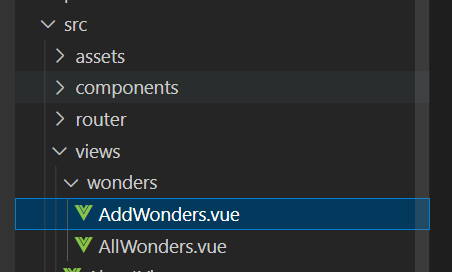 Now configure routing for 'AddWonders.vue' component in the 'router/index.js'.src/router/index.js:
import { createRouter, createWebHistory } from "vue-router";
import AllWonders from "../views/wonders/AllWonders.vue";
import AddWonders from "../views/wonders/AddWonders.vue";
const router = createRouter({
history: createWebHistory(importa.env.BASE_URL),
routes: [
{
path: "/",
name: "home",
component: AllWonders,
},
{
path: "/add-wonder",
name: "Add Wonder",
component: AddWonders,
},
],
});
export default router;
(Line: 12-16) Configured the '/add-wonder' router for 'AddWonders.vue' component.
Implement Create Operation:The Create operation means posting the data to the HTTP POST API call for creating the new item.src/views/wonders/AddWonders.vue:
import axios from "axios";
import { reactive } from "vue";
import { useRouter } from "vue-router";
let newWonder = reactive({
name: "",
location: "",
imageUrl: "",
});
const router = useRouter();
const addNewWonder = () => {
axios.post("http://localhost:3000/wonders", newWonder).then(() => {
router.push("/");
});
};
Add New Wonder's
Wonder Name
Location
Image URL
Add
(Line: 1) The 'setup' attribute added to the script tag that represents we are using the composition API approach.(Line: 5-9) The 'reactive' type loads from 'vue' library. The 'reactive' type is appropriate for creating models for the form binding. Here we defined properties like 'name', 'location', and 'imageUrl' which can use for form binding.(Line: 11-15) The 'addNewWonder' method contains logic to invoke the HTTP Post API call.In vue to enable the form model binding we will use 'v-model' attribute. Each form field must be decorated with the 'v-model'.(Line: 20) The '@submit.prevent' event raises on clicking the form submit button, but it won't reload the page since we configured the 'prevent' event. Here '@submit.prevent' is registered with 'addNewWonder' method.
Let's configure the 'Add' button in 'AllWonders.vue' component so that we can navigate from the 'AllWonders.vue' to 'AddWonders.vue'.src/views/wonders/Allwonders.vue:
import { ref, onMounted } from "vue";
import axios from "axios";
const allWonders = ref([]);
onMounted(() => {
axios.get("http://localhost:3000/wonders").then((response) => {
allWonders.value = response.data;
});
});
Add Now configure routing for 'AddWonders.vue' component in the 'router/index.js'.src/router/index.js:
import { createRouter, createWebHistory } from "vue-router";
import AllWonders from "../views/wonders/AllWonders.vue";
import AddWonders from "../views/wonders/AddWonders.vue";
const router = createRouter({
history: createWebHistory(importa.env.BASE_URL),
routes: [
{
path: "/",
name: "home",
component: AllWonders,
},
{
path: "/add-wonder",
name: "Add Wonder",
component: AddWonders,
},
],
});
export default router;
(Line: 12-16) Configured the '/add-wonder' router for 'AddWonders.vue' component.
Implement Create Operation:The Create operation means posting the data to the HTTP POST API call for creating the new item.src/views/wonders/AddWonders.vue:
import axios from "axios";
import { reactive } from "vue";
import { useRouter } from "vue-router";
let newWonder = reactive({
name: "",
location: "",
imageUrl: "",
});
const router = useRouter();
const addNewWonder = () => {
axios.post("http://localhost:3000/wonders", newWonder).then(() => {
router.push("/");
});
};
Add New Wonder's
Wonder Name
Location
Image URL
Add
(Line: 1) The 'setup' attribute added to the script tag that represents we are using the composition API approach.(Line: 5-9) The 'reactive' type loads from 'vue' library. The 'reactive' type is appropriate for creating models for the form binding. Here we defined properties like 'name', 'location', and 'imageUrl' which can use for form binding.(Line: 11-15) The 'addNewWonder' method contains logic to invoke the HTTP Post API call.In vue to enable the form model binding we will use 'v-model' attribute. Each form field must be decorated with the 'v-model'.(Line: 20) The '@submit.prevent' event raises on clicking the form submit button, but it won't reload the page since we configured the 'prevent' event. Here '@submit.prevent' is registered with 'addNewWonder' method.
Let's configure the 'Add' button in 'AllWonders.vue' component so that we can navigate from the 'AllWonders.vue' to 'AddWonders.vue'.src/views/wonders/Allwonders.vue:
import { ref, onMounted } from "vue";
import axios from "axios";
const allWonders = ref([]);
onMounted(() => {
axios.get("http://localhost:3000/wonders").then((response) => {
allWonders.value = response.data;
});
});
Add
Location: {{ item.location }} (Line: 15) Added the 'RouterLink' its 'to' attribute configured with '/add-wonder' route. (Step 1)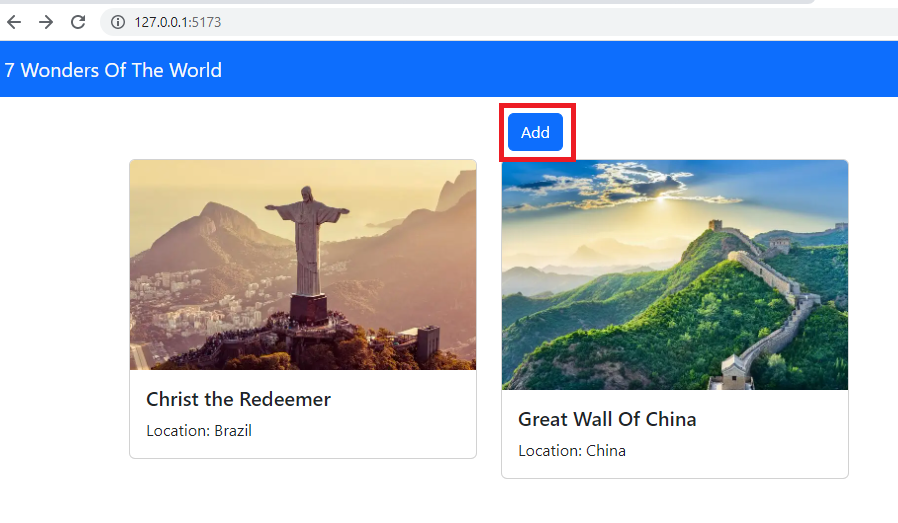 (Step 2) (Step 2)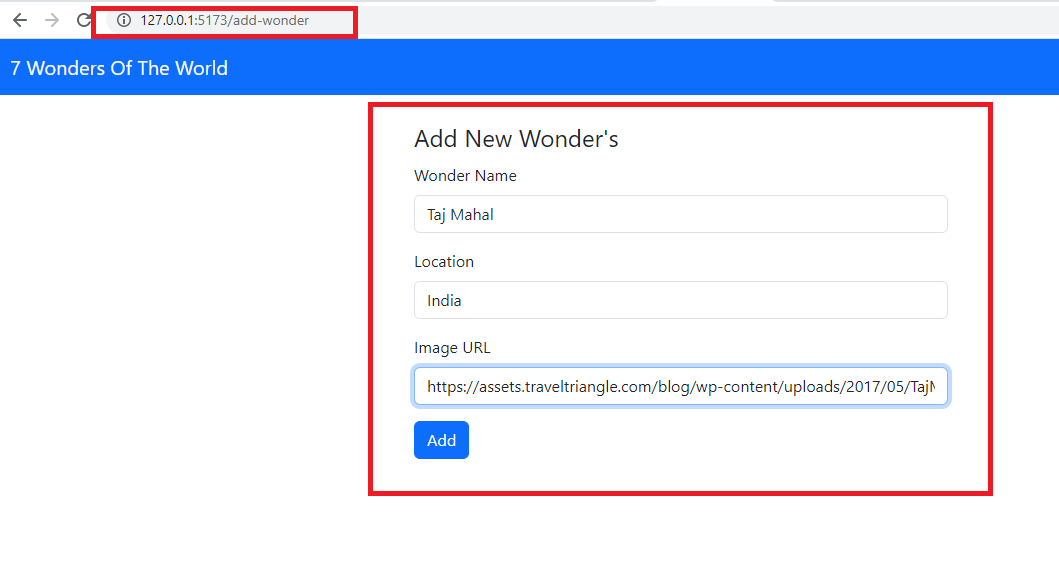 (Step 3) (Step 3)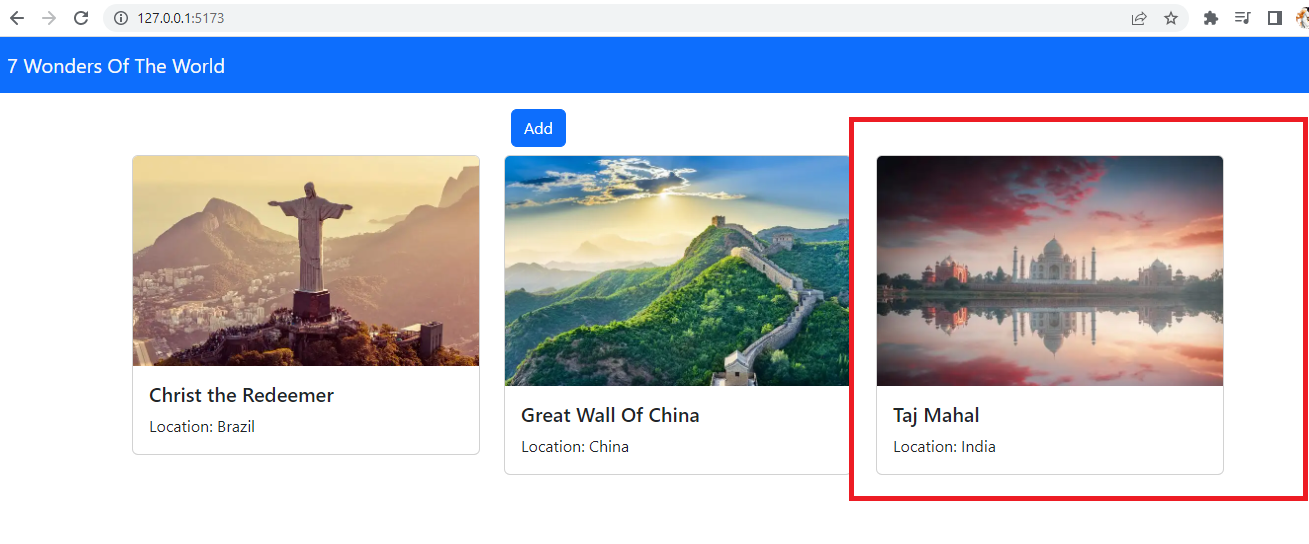 Create A 'EditWonders.vue' Component:Let's create a new Vue component 'EditWornders.vue' in 'src/views/wonders'.
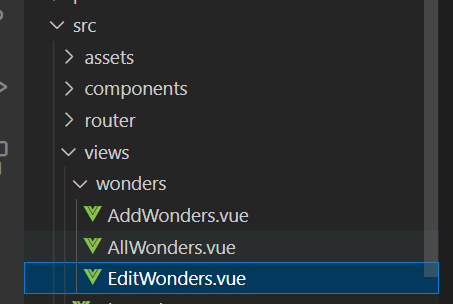 Now configure routing for the 'EditWonders.vue' component in 'router/index.js'.src/router/index.js:
import { createRouter, createWebHistory } from "vue-router";
import AllWonders from "../views/wonders/AllWonders.vue";
import AddWonders from "../views/wonders/AddWonders.vue";
import EditWonders from "../views/wonders/EditWonders.vue";
const router = createRouter({
history: createWebHistory(importa.env.BASE_URL),
routes: [
{
path: "/",
name: "home",
component: AllWonders,
},
{
path: "/add-wonder",
name: "Add Wonder",
component: AddWonders,
},
{
path: "/edit-wonder/:id",
name: "Edit Wonder",
component: EditWonders,
}
],
});
export default router;
(Line: 18-22) configured the 'edit-wonder/:id' route for the 'EditWonders.vue' component. Here ':id' is the dynamic placeholder where we define an item to edit the 'id' value in the route.
Implement Update Operation:The update operation means invoking the HTTP PUT endpoint to update the existing item.src/views/wonders/EditWonders.vue:
import axios from "axios";
import { reactive, onMounted } from "vue";
import { useRouter, useRoute } from "vue-router";
let wonderToUpdate = reactive({
id: 0,
name: "",
location: "",
imageUrl: "",
});
const router = useRouter();
const route = useRoute();
onMounted(() => {
axios
.get(`http://localhost:3000/wonders/${route.params.id}`)
.then((response) => {
wonderToUpdate.id = response.data.id;
wonderToUpdate.name = response.data.name;
wonderToUpdate.location = response.data.location;
wonderToUpdate.imageUrl = response.data.imageUrl;
});
});
const updateWonder = () => {
axios.put(`http://localhost:3000/wonders/${route.params.id}`, wonderToUpdate).then(() => {
router.push("/");
});
};
Update Wonders
Name
Location
Image URL
Update
(Line: 1) The 'setup' attribute added to the script tag that represents we are using the composition API approach.(Line: 6-11) The 'reactive' type loads from the 'vue' library. The 'reactive' type is appropriate for creating the model for the form binding in vue. Here we defined properties like 'id', 'name', 'location', and 'imageUrl' which can use for the form binding.(Line: 13) The 'useRouter' loads from the 'vue-router' library that helps with navigation.(Line: 14) The 'useRoute' loads from the 'vue-router' library that helps to read the URL parameters.(Line; 16-25) The 'onMounted' is a Vue life-cycle method in which we invoke the get by 'id' endpoint to populate the item data on to our update form.(Line: 27-31) Here we defined a method like 'updateWonder' that contains logic to invoke the HTTP PUT request to update the item.In vue enable the form model binding we will use 'v-model' attribute. Each form field must be decorate with 'v-model'.(Line: 35) The '@submit.prevent' event raises on clicking the form submit button, but it won't reload the page since we configured the 'prevent' event. Here '@submit.prevent' is registered with 'updateWonder' method.
Let's configure the 'Edit' button in 'AllWonders.vue' component. So that we can navigate from the 'AllWonders.vue' to 'EditWonders.vue'.src/views/wonders/EditWonders.vue: Now configure routing for the 'EditWonders.vue' component in 'router/index.js'.src/router/index.js:
import { createRouter, createWebHistory } from "vue-router";
import AllWonders from "../views/wonders/AllWonders.vue";
import AddWonders from "../views/wonders/AddWonders.vue";
import EditWonders from "../views/wonders/EditWonders.vue";
const router = createRouter({
history: createWebHistory(importa.env.BASE_URL),
routes: [
{
path: "/",
name: "home",
component: AllWonders,
},
{
path: "/add-wonder",
name: "Add Wonder",
component: AddWonders,
},
{
path: "/edit-wonder/:id",
name: "Edit Wonder",
component: EditWonders,
}
],
});
export default router;
(Line: 18-22) configured the 'edit-wonder/:id' route for the 'EditWonders.vue' component. Here ':id' is the dynamic placeholder where we define an item to edit the 'id' value in the route.
Implement Update Operation:The update operation means invoking the HTTP PUT endpoint to update the existing item.src/views/wonders/EditWonders.vue:
import axios from "axios";
import { reactive, onMounted } from "vue";
import { useRouter, useRoute } from "vue-router";
let wonderToUpdate = reactive({
id: 0,
name: "",
location: "",
imageUrl: "",
});
const router = useRouter();
const route = useRoute();
onMounted(() => {
axios
.get(`http://localhost:3000/wonders/${route.params.id}`)
.then((response) => {
wonderToUpdate.id = response.data.id;
wonderToUpdate.name = response.data.name;
wonderToUpdate.location = response.data.location;
wonderToUpdate.imageUrl = response.data.imageUrl;
});
});
const updateWonder = () => {
axios.put(`http://localhost:3000/wonders/${route.params.id}`, wonderToUpdate).then(() => {
router.push("/");
});
};
Update Wonders
Name
Location
Image URL
Update
(Line: 1) The 'setup' attribute added to the script tag that represents we are using the composition API approach.(Line: 6-11) The 'reactive' type loads from the 'vue' library. The 'reactive' type is appropriate for creating the model for the form binding in vue. Here we defined properties like 'id', 'name', 'location', and 'imageUrl' which can use for the form binding.(Line: 13) The 'useRouter' loads from the 'vue-router' library that helps with navigation.(Line: 14) The 'useRoute' loads from the 'vue-router' library that helps to read the URL parameters.(Line; 16-25) The 'onMounted' is a Vue life-cycle method in which we invoke the get by 'id' endpoint to populate the item data on to our update form.(Line: 27-31) Here we defined a method like 'updateWonder' that contains logic to invoke the HTTP PUT request to update the item.In vue enable the form model binding we will use 'v-model' attribute. Each form field must be decorate with 'v-model'.(Line: 35) The '@submit.prevent' event raises on clicking the form submit button, but it won't reload the page since we configured the 'prevent' event. Here '@submit.prevent' is registered with 'updateWonder' method.
Let's configure the 'Edit' button in 'AllWonders.vue' component. So that we can navigate from the 'AllWonders.vue' to 'EditWonders.vue'.src/views/wonders/EditWonders.vue:
Location: {{ item.location }} Edit (Line: 6) The 'Routerlink' is configured as our Edit button. Here is our dynamically generated edit route adding at 'to' attribute. (Step 1)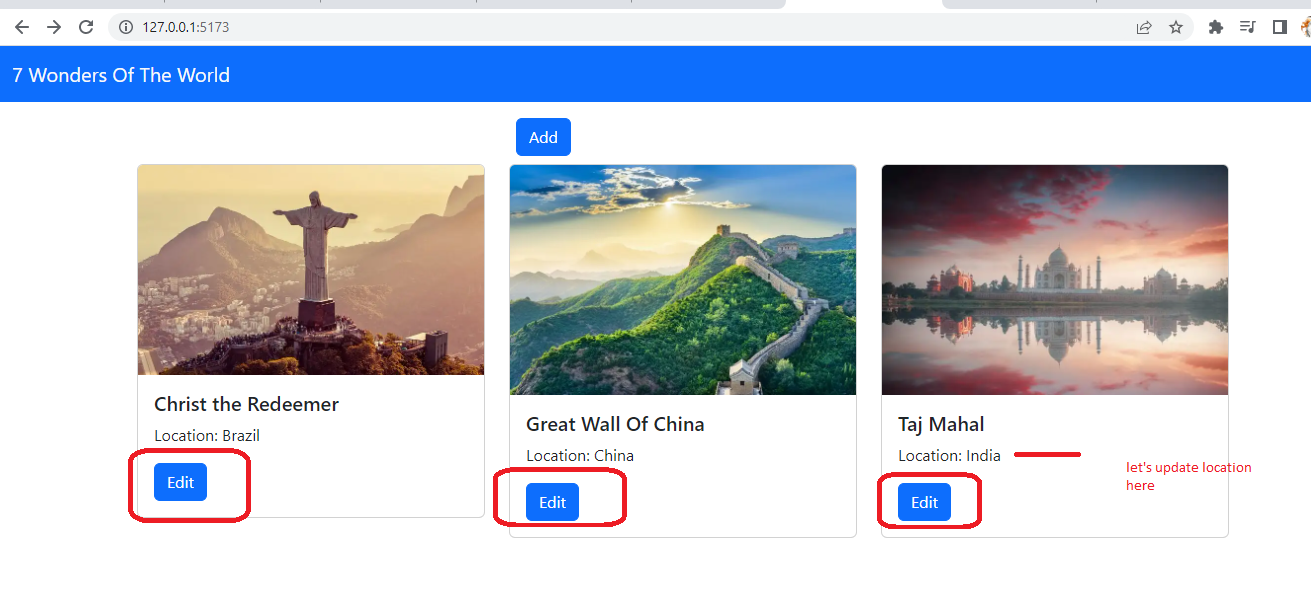 (Step 2) (Step 2)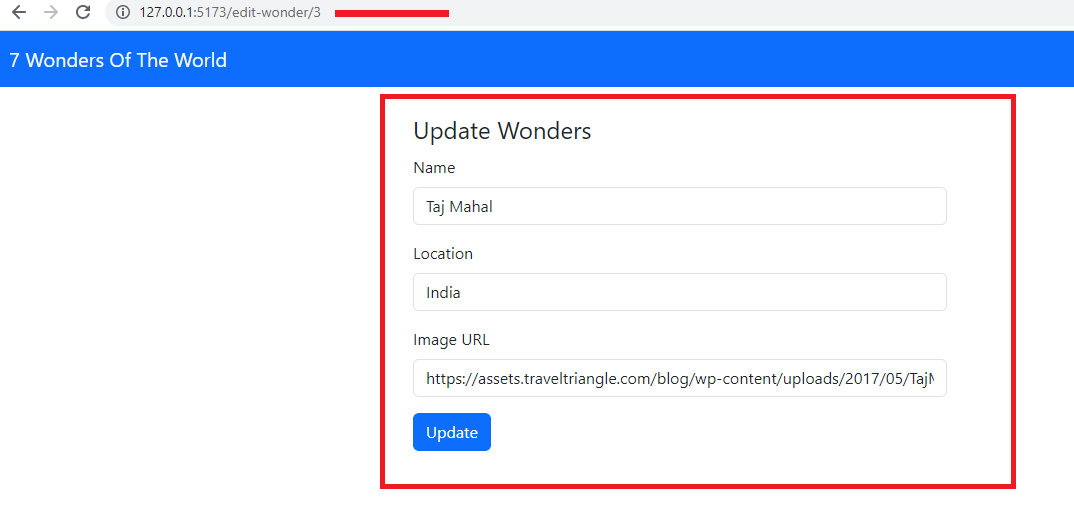 (Step 3) (Step 3)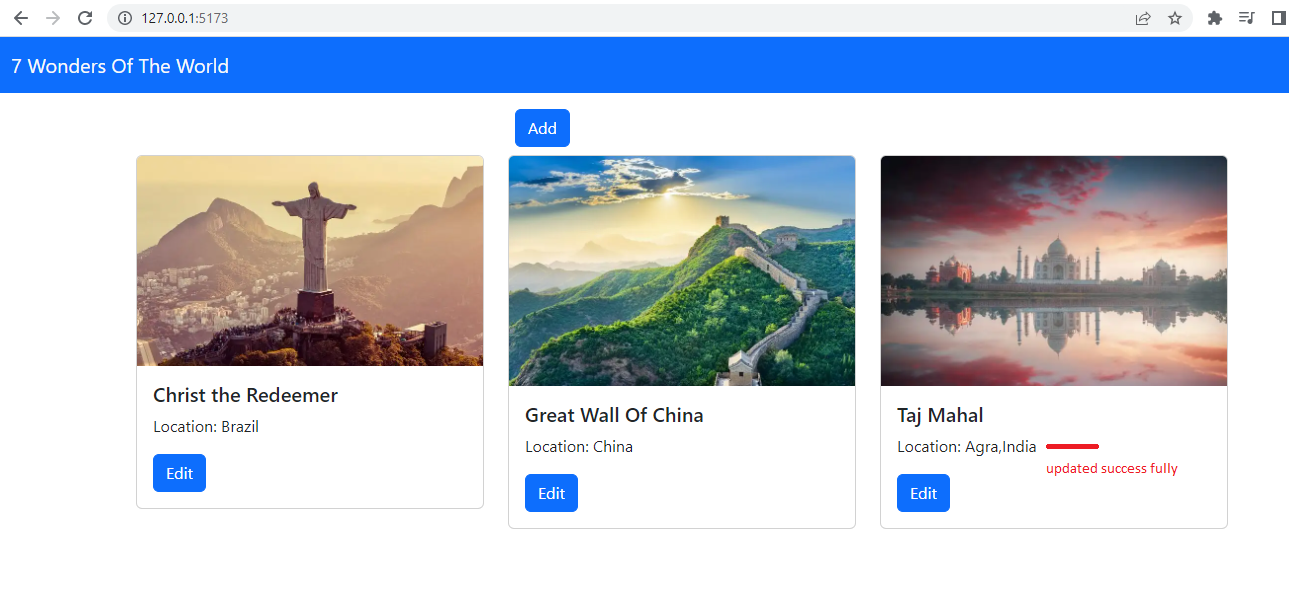 Create A 'ConfirmDeletePopup' Component:Let's create 'ConfirmDeletePopup.vue' VueJS component in 'src/components' folder, this component can be used as global and its functionality is to show a popup for deleting any kind of item for your application.src/components/ConfirmDeletePopup.vue:
Delete Confirmation!
Are you sure to delete this item
Close
Confirm Delete
Here we added the bootstrap modal HTML content.(Line: 5) Make sure to give 'id' attribute value fo the bootstrap modal.(Line: 34) Here button click emits 'confirmdelete-click' which means we are trying to receive an event from the child component(ConfirmDeletePopup.vue) to the parent component(like 'AllWonders.vue'). To emit the event we have to use '$emit()'.
Implement Delete Operation:The delete operation means invoking the HTTP Delete endpoint for deleting the item.src/views/wonders/AllWonders.vue:
import { ref, onMounted } from "vue";
import ConfirmDeletePopup from "../../components/ConfirmDeletePopup.vue";
import axios from "axios";
const allWonders = ref([]);
const itemToDeleteId = ref([0]);
let deleteModal;
onMounted(() => {
deleteModal = new window.bootstrap.Modal(
document.getElementById("deleteModal"));
axios.get("http://localhost:3000/wonders").then((response) => {
allWonders.value = response.data;
});
});
const openDeleteModal = (id) => {
itemToDeleteId.value = id;
deleteModal.show();
};
const confirmDelete = () => {
axios
.delete(`http://localhost:3000/wonders/${itemToDeleteId.value}`)
.then(() => {
allWonders.value = allWonders.value.filter(
(_) => _.id !== itemToDeleteId.value
);
itemToDeleteId.value = 0;
deleteModal.hide();
});
};
Add
Create A 'ConfirmDeletePopup' Component:Let's create 'ConfirmDeletePopup.vue' VueJS component in 'src/components' folder, this component can be used as global and its functionality is to show a popup for deleting any kind of item for your application.src/components/ConfirmDeletePopup.vue:
Delete Confirmation!
Are you sure to delete this item
Close
Confirm Delete
Here we added the bootstrap modal HTML content.(Line: 5) Make sure to give 'id' attribute value fo the bootstrap modal.(Line: 34) Here button click emits 'confirmdelete-click' which means we are trying to receive an event from the child component(ConfirmDeletePopup.vue) to the parent component(like 'AllWonders.vue'). To emit the event we have to use '$emit()'.
Implement Delete Operation:The delete operation means invoking the HTTP Delete endpoint for deleting the item.src/views/wonders/AllWonders.vue:
import { ref, onMounted } from "vue";
import ConfirmDeletePopup from "../../components/ConfirmDeletePopup.vue";
import axios from "axios";
const allWonders = ref([]);
const itemToDeleteId = ref([0]);
let deleteModal;
onMounted(() => {
deleteModal = new window.bootstrap.Modal(
document.getElementById("deleteModal"));
axios.get("http://localhost:3000/wonders").then((response) => {
allWonders.value = response.data;
});
});
const openDeleteModal = (id) => {
itemToDeleteId.value = id;
deleteModal.show();
};
const confirmDelete = () => {
axios
.delete(`http://localhost:3000/wonders/${itemToDeleteId.value}`)
.then(() => {
allWonders.value = allWonders.value.filter(
(_) => _.id !== itemToDeleteId.value
);
itemToDeleteId.value = 0;
deleteModal.hide();
});
};
Add
Location: {{ item.location }} Edit | Delete (Line: 7) Declared the variable like 'deleteModal'.(Line: 10-11) Bootstrap instance assigned to the 'deleteModal'.Here we use the modal 'id' attribute value while creating the bootstrap instance.(Line: 18-21) The 'openDeleteModal' method contains logic to show the delete confirmation modal on clicking the delete button. Here we set the item to delete 'id' value to 'itemToDelete' variable.(Line: 23-33) The 'confirmDelete' method contains logic to invoke the delete API call. On successful deletion, we are going to update our 'allWonders' variable and then hide the bootstrap modal.(Line: 52-58) Here we added the 'Delete' button and its click registered with the 'openDeleteModal' method.(Line: 64)Rendered our 'ConfirmDeletePopup' component and registered with '@confirmdelete-click' which reads the button click from the child component(ConfirmDeletePopup.vue)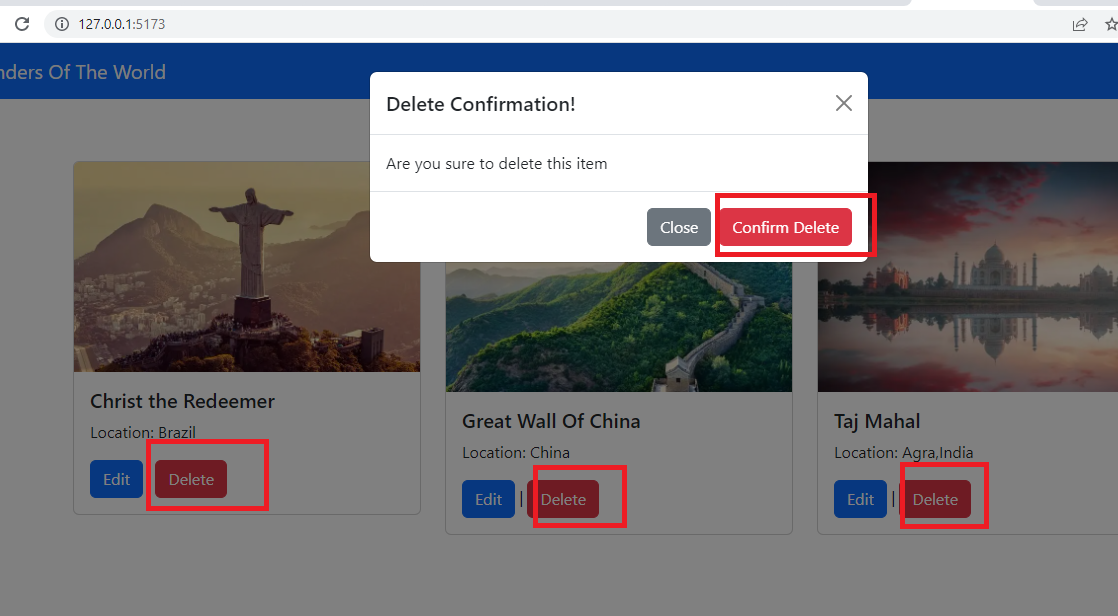
Support Me! Buy Me A Coffee PayPal Me Video Session: Wrapping Up:Hopefully, I think this article delivered some useful information on the Vue(3.0) CRUD sample. using I love to have your feedback, suggestions, and better techniques in the comment section below.Refer:Source CodeFollow Me: YouTube Facebook Twitter Pinterest |
【本文地址】
公司简介
联系我们